Set Up A Node.js Server
Do you want to upload files to Amazon S3 with Node.js but not sure how? Don’t worry! We’re here to help you.
But first, let’s find out how to set up a Node.js server.
- express: A framework for creating Node.js APIs.
- dotenv: Allows to access environment variables in the .env file.
- formidable: A data parser that supports uploading of the files.
- @aws-sdk/lib-storage: An AWS SDK library used for uploading large files to S3
- @aws-sdk/client-s3: This is an AWS SDK S3 Client for Node.js.
You can install these packages with the help of this command:
Next, create an index.js file to set up the server. Since this application is for tutorial purposes, I will set up the HTML form in the same file. You can go with a different setup.
The next step for setting up the server is to create an index.js file. Since this application is for tutorial purpose, we’re setting up the HTML form in the same.
const app = express();
require(‘dotenv’).config();
app.set(‘json spaces’, 5); // to pretify json response
const PORT = process.env.PORT || 3000;
app.get('/', (req, res) => {
res.send(`
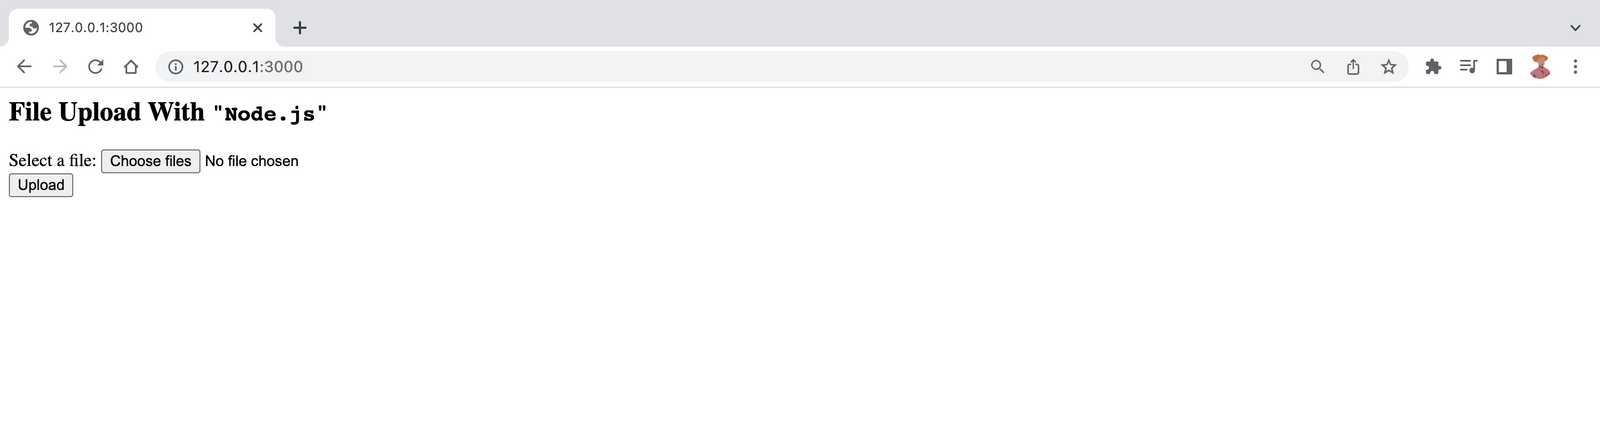
<h2>File Upload With <code>"Node.js"</code></h2>
<form action="/api/upload" enctype="multipart/form-data" method="post">
<div>Select a file:
<input type="file" name="file" multiple="multiple" />
</div>
<input type="submit" value="Upload" />
</form>
`);
});
app.listen(PORT, () => {
console.log(`Server running on port ${PORT}.`)
})Launch the server with the node index.js command. Once everything seems to be running, check for the confirmation message “Server running on port 3000” in your terminal to ensure everything is running.
To confirm that everything works as expected, check for the message Server running on port 3000. on your terminal.
Once it’s running, look for the confirmation message “Server running on port 3000.” in your terminal to ensure everything is set up correctly.
With the server operational, open your web browser and go to http://127.0.0.1:3000/ (replace 3000 with the port number your server is using). You should see a form displayed on the page.
Steps To Configure The Parser File
We’re using the Node.js formidable package to facilitate the transfer of files from the client to an S3 bucket.
The formidable module accepts an options object that encompasses various file properties. These properties have default values that you can always overwrite to configure the parser as per your requirement. to tailor the parser to your requirements. Some of the keys are:
- allowEmptyFiles: This boolean property dictates whether empty files are permitted, with a default value of true.
- minFileSize: This property specifies the minimum allowable file size as a numeric value, with a default setting of 1 byte.
- maxFileSize: This property sets the maximum allowable file size, represented by a numeric value. The default limit is 200 megabytes (MB).
So, if you want your app to accept files smaller than or equal to size 100 MB, you must maxFileSize option in the Options Object. You can do this by opening a fileparser.js file, and then adding the below code:
const parsefile = async (req) => {
return new Promise((resolve, reject) => {
let options = {
maxFileSize: 100 * 1024 * 1024, //100 MBs converted to bytes,
allowEmptyFiles: false
}
const form = formidable(options);
form.parse(req, (err, fields, files) => {});
})
}
module.exports = parsefile;
This service generates a form instance that is configured to disallow empty uploads and only handles files of 100 MB or smaller. It returns a promise that resolves with the upload details upon successful processing, while rejecting with error details if an issue occurs.
To process incoming requests, it calls the form.parse() method, which takes two arguments: the request payload and a callback function. Within this callback function, you can access fields, files, and any parsing errors (accessible via the ‘err’ parameter).
You have the option to override this method if you wish to directly access the multipart stream. By doing so, any automatic processing of ‘field’ or ‘file’ events will be disabled, placing the responsibility entirely on you to manage the processing. ~ Formidable
However, we are not overwriting it as we need the form instance to stream the file to the S3 bucket.
Steps Handle Form Events
If you’ve no idea about events in programming, make sure to go through these terms before continuing.
Basically, events refer to occurrences within the system you’re programming, which the system notifies you about so that your code can respond accordingly. (MDN)
Some of the events that form instance emits while processing a file are:
- An error event for errors in the parsing process.
- A file event when it receives a file/field pair.
- A progress event after parsing each chunk of data.
You can define how you want to handle these events using the form.on() method.
With on(), you provide an event name and a listener function, which activates whenever the form emits the specified event. Failing to handle certain events, such as errors, may result in request timeouts. Within the listener function, you have the ability to dictate the program’s response to each emitted event.
Here’s how you update the fileparser.js file with the on() method:
const parsefile = async (req) => {
return new Promise((resolve, reject) => {
let options = {
maxFileSize: 100 * 1024 * 1024, //100 MBs converted to bytes,
allowEmptyFiles: false
}
const form = formidable(options);
form.parse(req, (err, fields, files) => {});
form.on(‘error’, error => {
reject(error.message)
})
form.on(‘data’, data => {
if (data.name === “successUpload”) {
resolve(data.value);
}
})
})
}
module.exports = parsefile;
You’ll get a successful response with the data listener when the S3 upload is successful S3. Whereas, the error listener keeps an eye for error events and sends the error response to the client.
For an instance, you may get this when error message while trying to upload an emply file.

Make sure to monitor the fileBegin event as well.
Steps To Create The File Stream
But before this let’s see why streaming. This is because with streaming we don’t need to wait for the complete file before processing; each data chunk is processed upon reception.
Now, In the fileparser.js file, import the Transform class from the Node.js stream module. This class will be used to create a transform stream, which will serve as the body of the uploaded object.
The next step is to invoke the form.on method with the fileBegin event name and the associated listener function. The listener function in this context handles the fileBegin event.
This function accepts two parameters: formName and file. formName, representing the name of the form containing the file, while file is an object containing file details. Here, the focus is on the file object.
The file object is an instance of the Formidable PersistentFile class, derived from the Node.js EventEmitter class. The PersistentFile class provides methods such as open() and end(), which you can overwrite to define custom actions when triggered.
To manage the stream upload, create an asynchronous function and assign it to the file.open method.
Here’s how to update the fileParser.js file:
const Transform = require(‘stream’).Transform;
const parsefile = async (req) => {
return new Promise((resolve, reject) => {
let options = {
maxFileSize: 100 * 1024 * 1024, //100 MBs converted to bytes,
allowEmptyFiles: false
}
const form = formidable(options);
form.parse(req, (err, fields, files) => {});
form.on(‘error’, error => {
reject(error.message)
})
form.on(‘data’, data => {
if (data.name === “successUpload”) {
resolve(data.value)
}
})
form.on(‘fileBegin’, (formName, file) => {
file.open = async function () {
this._writeStream = new Transform({
transform(chunk, encoding, callback) {
callback(null, chunk)
}
})
this._writeStream.on(‘error’, e => {
form.emit(‘error’, e)
});
}
})
})
}
module.exports = parsefile;
This function generates a Transform class instance, responsible for processing data chunks via an internal transform method. Subsequently, the resulting stream is designated as the write stream for the file object, achieved through setting it as this._writeStream.
Following this setup, we add an ‘on’ listener to this._writeStream to manage any errors occurring during the streaming operation.
Steps to upload to the S3 Bucket
This section is where file storage hapepns.
In the fileparser.js file, import the Upload module from the @aws-sdk/lib-storage package. This module facilitates file uploads in segments. Additionally, import the S3Client from the @aws-sdk/client-s3 package.
const { S3Client, S3 } = require(“@aws-sdk/client-s3”);
To set up the upload configuration, you’ll require your AWS credentials.
- Refer to the instructions provided on the AWS website to obtain your access keys.
- Ensure you check the S3 console to verify both your bucket name and region.
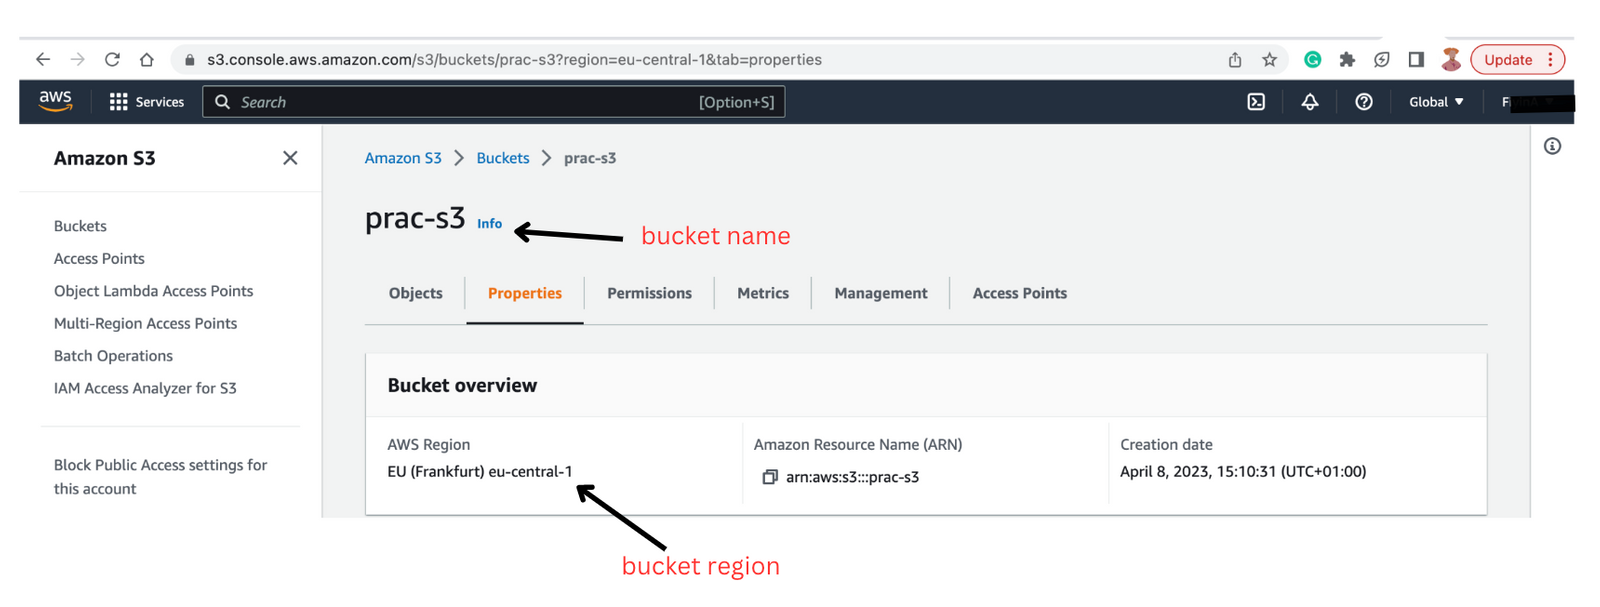
- The next step is to add them to your .env file and assign them to the fileparser.js file.
AWS_ACCESS_KEY_ID=
AWS_SECRET_ACCESS_KEY=
S3_REGION=eu-central-1
S3_BUCKET=prac-s3
Subsequently, instantiate a new Upload module instance, imported from @aws-sdk/lib-storage, inside the file.open method. Configure this instance with various options, such as:
- Client: This refers to the destination of the file. Given that we’re uploading to an S3 bucket, we’ll utilise the S3Client provided by AWS. Add a new instance of the S3Client and configure it by adding your AWS credentials includingg AWS secret access key and AWS access key ID. Additionally, specify the region of the bucket within the client configuration.
- params: This object encompasses various details, including the S3 bucket name (Bucket), the Key (which defines the file name), the access control list (ACL) governing data access, and the Body (representing the generated transform stream).
- queueSize: This parameter dictates the number of parts processed concurrently. By default, it’s set to 4.
- partSize: This parameter determines the size of each processed part. The minimum size permissible is 5MB.
Here’s the updated fileparser.js file:
const { S3Client } = require(“@aws-sdk/client-s3”);
const Transform = require(‘stream’).Transform;
const accessKeyId = process.env.AWS_ACCESS_KEY_ID;
const secretAccessKey = process.env.AWS_SECRET_ACCESS_KEY;
const region = process.env.S3_REGION;
const Bucket = process.env.S3_BUCKET;
const parsefile = async (req) => {
return new Promise((resolve, reject) => {
let options = {
maxFileSize: 100 * 1024 * 1024, //100 MBs converted to bytes,
allowEmptyFiles: false
}
const form = formidable(options);
form.parse(req, (err, fields, files) => {});
form.on(‘error’, error => {
reject(error.message)
})
form.on(‘data’, data => {
if (data.name === “successUpload”) {
resolve(data.value);
}
})
form.on(‘fileBegin’, (formName, file) => {
file.open = async function () {
this._writeStream = new Transform({
transform(chunk, encoding, callback) {
callback(null, chunk)
}
})
this._writeStream.on(‘error’, e => {
form.emit(‘error’, e)
});
// upload to S3
new Upload({
client: new S3Client({
credentials: {
accessKeyId,
secretAccessKey
},
region
}),
params: {
ACL: ‘public-read’,
Bucket,
Key: `${Date.now().toString()}-${this.originalFilename}`,
Body: this._writeStream
},
tags: [], // optional tags
queueSize: 4, // optional concurrency configuration
partSize: 1024 * 1024 * 5, // optional size of each part, in bytes, at least 5MB
leavePartsOnError: false, // optional manually handle dropped parts
})
.done()
.then(data => {
form.emit(‘data’, { name: “complete”, value: data });
}).catch((err) => {
form.emit(‘error’, err);
})
}
})
})
}
module.exports = parsefile;
The done method appended to the Upload instance yields a promise upon completion of the upload process.
Upon successful upload, this promise resolves with an object detailing information regarding the uploaded file. Subsequently, the form instance triggers a data event, providing the complete name and the returned data. This emitted event delivers a successful response to the client.
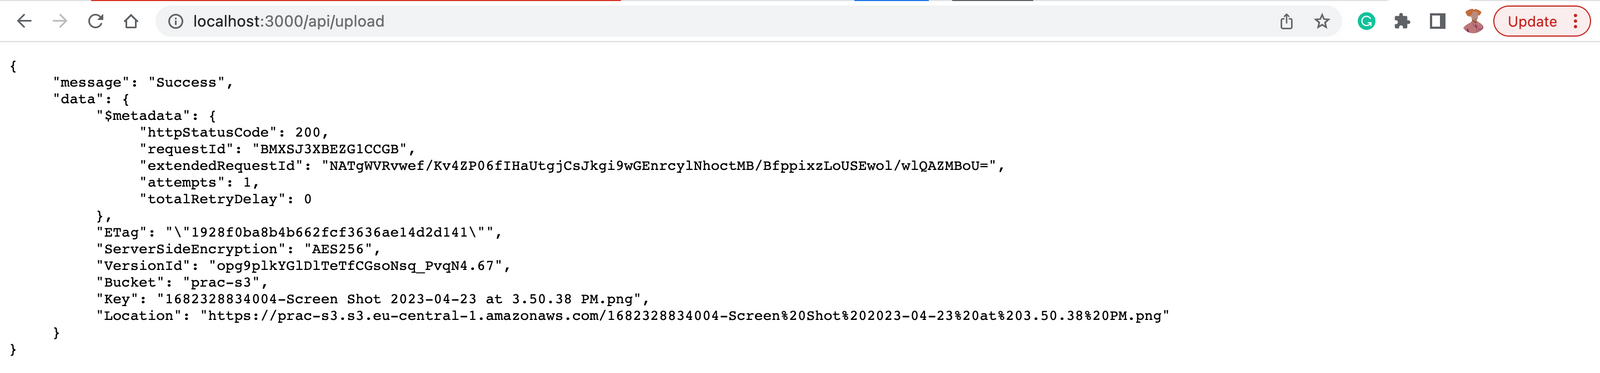
The response data contains pertinent details regarding the upload, encompassing:
- $metadata: An object containing status code, upload attempt count, and related information.
- Key: The File name.
- Location: URL directing to the file’s location, facilitating download.
In case of upload failure, the promise is rejected with an error message, prompting the form instance to trigger an error event.
To ensure each data chunk is written to the stream before closure, modify the file.end() method to make sure the write stream emits a finish event prior to invoking its end method. This finish event signals that all data has been written to the stream and it has been closed. Meanwhile, the end event on the stream object indicates the stream’s termination.
Below is the updated fileparser.js file:
const { S3Client } = require(“@aws-sdk/client-s3”);
const Transform = require(‘stream’).Transform;
const accessKeyId = process.env.AWS_ACCESS_KEY_ID;
const secretAccessKey = process.env.AWS_SECRET_ACCESS_KEY;
const region = process.env.S3_REGION;
const Bucket = process.env.S3_BUCKET;
const parsefile = async (req) => {
return new Promise((resolve, reject) => {
let options = {
maxFileSize: 100 * 1024 * 1024, //100 MBs converted to bytes,
allowEmptyFiles: false
}
const form = formidable(options);
form.parse(req, (err, fields, files) => {});
form.on(‘error’, error => {
reject(error.message)
})
form.on(‘data’, data => {
if (data.name === “successUpload”) {
resolve(data.value);
}
})
form.on(‘fileBegin’, (formName, file) => {
file.open = async function () {
this._writeStream = new Transform({
transform(chunk, encoding, callback) {
callback(null, chunk)
}
})
this._writeStream.on(‘error’, e => {
form.emit(‘error’, e)
});
// upload to S3
new Upload({
client: new S3Client({
credentials: {
accessKeyId,
secretAccessKey
},
region
}),
params: {
ACL: ‘public-read’,
Bucket,
Key: `${Date.now().toString()}-${this.originalFilename}`,
Body: this._writeStream
},
tags: [], // optional tags
queueSize: 4, // optional concurrency configuration
partSize: 1024 * 1024 * 5, // optional size of each part, in bytes, at least 5MB
leavePartsOnError: false, // optional manually handle dropped parts
})
.done()
.then(data => {
form.emit(‘data’, { name: “complete”, value: data });
}).catch((err) => {
form.emit(‘error’, err);
})
}
file.end = function (cb) {
this._writeStream.on(‘finish’, () => {
this.emit(‘end’)
cb()
})
this._writeStream.end()
}
})
})
}
module.exports = parsefile;
A clearer update might involve encapsulating the S3 upload process into a separate function and invoking it within the fileparser.js file.
Subsequently,introduce the upload route to update the index.js file. Import the fileparser module and establish a POST route. Since the module returns a promise, responses can be handled using .then() and errors using .catch().
Below is the revised index.js file:
const express = require('express');
const app = express();
require('dotenv').config();

app.set('json spaces', 5); // to pretify json response

const PORT = process.env.PORT || 3000;

app.get('/', (req, res) => {
  res.send(`
    <h2>File Upload With <code>"Node.js"</code></h2>
    <form action="/api/upload" enctype="multipart/form-data" method="post">
      <div>Select a file:
        <input type="file" name="file" multiple="multiple" />
      </div>
      <input type="submit" value="Upload" />
    </form>

  `);
});

app.listen(PORT, () => {
  console.log(`Server running on port ${PORT}.`)
})And there you have it!
Conclusion
This article has demonstrated the steps to configure your Node.js application for file uploads. It has explored how the formidable package simplifies this process through events and outlined the setup of the AWS-SDK Upload module.
The repository linked contains the corresponding code. As of the time of writing, the logic presented in the samples aligns with the content of the repository.
Did you like reading this article? Stay tuned to the MeisterIT Systems website blog!